Simple marker light
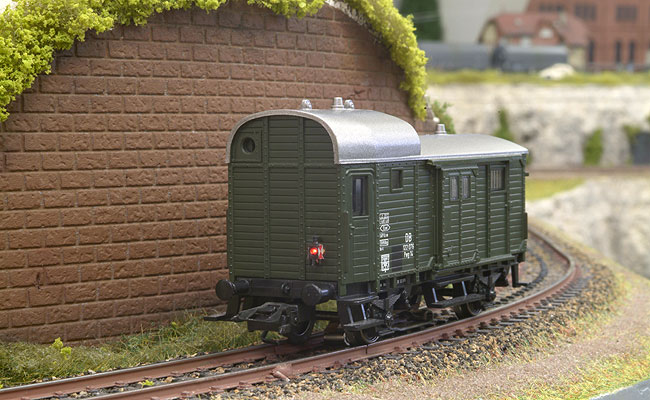
You would almost forget about it, but there has to be a marker light or marker board at the end of each train. You can buy a number of passenger cars with marker lights in the shop, but goods cars with marker lights are much harder to find. It takes just a handful of components and an hour of work to fit this working detail to any car you like.
I used a kit from Weinert for the marker light. With kit number 4200 you will get a brass lantern, decals, a micro light bulb and some electronics. The lantern is made exactly to scale and is a lot smaller than the oversized lanterns you often find on factory models. You can use the electronics to build a circuit that will produce a more or less constant voltage on an analogue layout. I did not use it, because I only want to use the marker light in a digital environment.
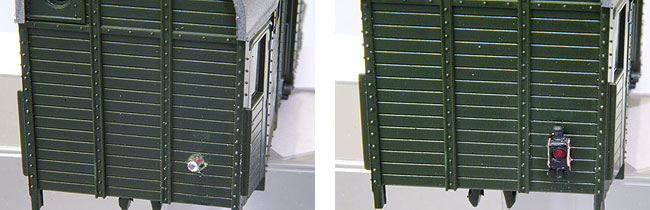
I added the marker light to a PwgPr14, a so-called ‘Güterzug-Begleitwagen’. De lantern has to be fitted to the back of the car. You start with assembling the lantern. The lantern has a hole on two sides. You glue a red disc in one of the holes with super glue. The other hole stays open. Next, you cut out two transfers, Just soak them in water for a couple of seconds and they will come loose of the paper. You can now put them on the side of the lantern. Scratches and cuts on the surface of the lantern can be repaired with a little bit of satin black paint. Now take a 1.5 mm drill and drill a hole in the back of the car. Put the light bulb through it, apply a bit of power glue and fit the lantern of the bulb. The lantern is finished.

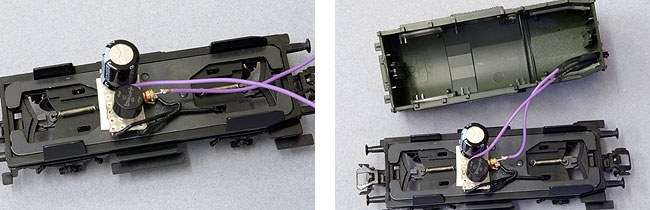
The kit comes with two copper tongues that you use to connect the light to the wheels. Drill a small hole in the floor. The hole has to be big enough to accommodate the little bolt. The tongues are fastened with the bolt to the bottom of the car and are resting on the axles. Fitting the pickup shoe is a slightly more challenging job. I glued a 5 mm high piece of plastic over the head of the bolt. The underside of the plastic piece had to be cut out, so it would fit exactly over the bolt. I glued the pickup shoe on the plastic piece.
The rails of a digital layout always carry the full 16 volts. That is way too much for the small light bulb that works at only 1.5 volts. I fitted a 1.5 K Ohm resistor to lower the voltage to an acceptable level. I also added a capacitor to diminish possible flickering. You also have to add a rectifier, because the capacitor will only work with DC.
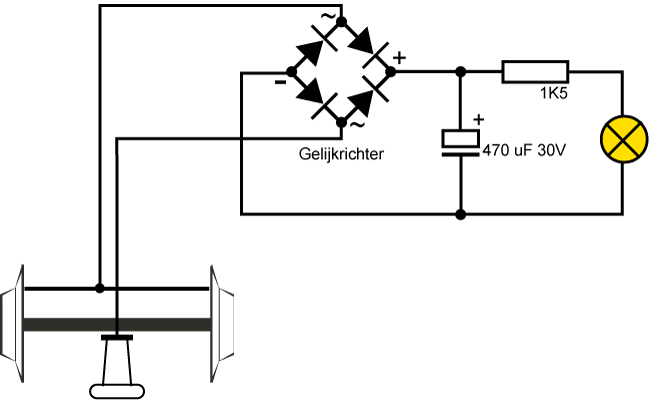
When we put everything together, you end up with a little circuit of a rectifier, a capacitor and a resistor. You can build it without a circuit board, but it will be better to put the components on a small piece of veroboard. Please note the correct polarity of the components. The + and – terminals are indicated on the rectifier and the capacitor with symbols. When everything is connected as it should, you can put the car back together. The car is now ‘Einsatzbereit’.
2003